Mostrando entradas con la etiqueta gwt. Mostrar todas las entradas

martes, 4 de diciembre de 2012

Guidelines for writing GWT Overlay types

Guidelines for writing GWT Overlay types

This post is related with an older post Eclipse templates for overlay types about the same topic. You can find eclipse java code templates for code proposed here in that section. Now, that I have my ideas more clear and tested this is a summary.

When writing overlay types we have to take in consideration two main ideas:

  • we are writing a Java class that will be used by Java users
  • we are overlaying a JavaScript object with an API designed to be used in JavaScript

The following presents some guidelines learned and adopted in my GWT libraries porting javascript libraries like YUI and raphaël to GWT using 100% overlay types for a zero overhead Java API implementation.

Constructor

Use a static method with a simple name like create() or newInstance() that return an empty object or an object with some desired initialization state. Example:

public class MyOverlay extends JavaScriptObject {
 protected MyOverlay(){}
 public static native final create()/*-{
  return {}; 
 }-*/;
}

Properties

In Java we use the Bean convention for accessing obejct attributes / properties with getters and setters methods:

public class MyOverlay extends JavaScriptObject {
 protected MyOverlay(){}
 public static native final create()/*-{
  return {}; 
 }-*/;
 public native final String getColor()/*-{
  return this.color; 
 }-*/;
 public native final void setColor(String color)/*-{
  this.color=color; 
 }-*/;
}
End User example code:
MyOverlay o = MyOverlay.create(); 
o.setColor("red"); 
aController.method1(o);

Nevertheless, we must remember that "we are overlaying a JavaScript object with an API designed to be used in JavaScript". In JavaScript we normally are able to define an entire object in a single statement. For accomplish this in Java we need our setters methods to return the this object so we can perform method chaning. Also, but not so important, se omit the prefixes get/set for there methods

public class MyOverlay extends JavaScriptObject {
 protected MyOverlay(){}
 public static native final create()/*-{
  return {}; 
 }-*/;
 public native final String color()/*-{
  return this["color"]; 
 }-*/;
 public native final MyOverlay color(String color)/*-{
  this["color"]=color; 
  return this; 
 }-*/;
}

End User example code:

aController.method1(MyOverlay.create().color("red")); 

Much more similar to its JavaScript common counterpart aController.method1({color: "red"}), don't you think ?

Some notes:

  • We use setters and getters without the prefixes "get" or "set", so our method names are the same as the property name. This make it easy to use IDE tools like eclipse Java Code templates for generating the getter/setter code automatically.
  • In JSNI code we use string literals this["color"] instead variable names like this.color so the closure compiler (available optionally in GWT > 2.5) don't mess up JavaScript Object property names.

For those Java convention lovers I think it wouldnt cost too much to have "normal" java bean getters and setters AND this kind of shorter accessor methods for those who like to define object more "a la" javascript.

About Performance

Unfortunately the proposed code style here adds some overhead to the JavaScript code output produced by the GWT compiler. In the following example, I have created 2 JSOs, one called NormalBean that follows the Java Bean getter/setter conventions and other one called JsFriendlyBean that uses the solution proposed here with setters that return 'this' for method chaining. Then I use them both and compared the resulting JavaScript output code by GWT compiler using -style PRETTY and -optimize 9 compiler options. This is the result:

Java Sources:

NormalBean normalBean = NormalBean.create();
normalBean.setColor("turttlered1");
normalBean.setAge(13);

JsFriendlyBeam jsFriendlyBeam = JsFriendlyBeam.create()
 .color("turttlered2").age(14); 

Window.alert(normalBean + " - " + jsFriendlyBeam);

JavaScript output:

normalBean = {};
normalBean['color'] = 'turttlered1';
normalBean['age'] = 13;
jsFriendlyBeam = $age($color({}, 'turttlered2'), 14);
$wnd.alert(normalBean + ' - ' + jsFriendlyBeam);
...
function $color(this$static, val){
  this$static['color'] = val;
  return this$static;
}
function $age(this$static, val){
  this$static['age'] = val;
  return this$static;
}

As you can see, the setters of the NormalBean are inlined in JavaScript with zero-overhead while the setters of JsFriendlyBean are not. In the later, JavaScript functions $age() and $color() are created and called and that adds little but some overhead.

I cannot find a workaround for this. Tried with single JSNI statements like the followings but the result is the same:

public native final JsFriendlyBeam age(int val) /*-{
 return (this["age"]=val, this); 
}-*/;
and
public native final JsFriendlyBeam age(int val) /*-{
 return (this["age"] = val || true) ? this : null;
}-*/;

If anybody has an idea about how this setters can be written so they are inlined in JavaScritp output, pleas share it with me :)

lunes, 15 de octubre de 2012

Testing GWT Service Classes synchronously using syncproxy

Testing GWT Service Classes synchronously using syncproxy


Why ?


In GWT applications that use RPC for client-server comunication, RPC "Services" classes bring a Web API to our business logic core in the server. For example, an RPC service class may be responsible of managing a certain model class (its CRUD operations, etc). It is important for us to write automated tests for ensuring a certain degree of quality of those RPC services, automatically.

In a common - not GWT application we just write Junit serverside tests that will use our services classes asynchronically. For example, a service for a managing Apples, could be easily tested with the code:

Apple a1 = new Apple(); 
a1.setId("a1"); 
a1.setColor("red"); 

appleService.addApple(a1); 
Apple a2 = appleService.getAppleByName("a1"); 
assertEquals("red", a2.getColor()); 

appleService.removeApple(a1); 
a2 = appleService.getAppleByName("a1"); 
assertTrue(a2 == null); 

Unfortunately, GWT RPC service class methods, are called asyncrhonously, so it is very hard to write the same test case, because, we need to"continue the next test " inside the (async) callback. So for writing  the last example using RPC async calls, we will end up with code that contains 4 or 5 anidated code blocks, like:

appleService.addApple(a1, new AsyncCallback<Void>() {

 @Override
 public void onSuccess(Void result) {

  appleService.getAppleByName("", new AsyncCallback<Apple>() {

   @Override
   public void onSuccess(Apple result) {
    assertTrue(result.getColor().equals("red"));

    // :( ... test folows here ... :(
   }

   @Override
   public void onFailure(Throwable caught) {
   }
  });
 }

 @Override
 public void onFailure(Throwable caught) {
 }
});

On a first thought I tried to remedy this using a datastructure I called SyncQueue, for putting each service method call in a queue and at the end, ask the sync queue to run each task synch. But as this example shows, this is also a not so productive and readable way of writing tests.

How to ? 


Thinking this for some time get me to the conclusion that I really need to write JUnit test calling my RPC service methods synchronously (like the first code example). The project syncproxy seemed what I wanted but it wasn't so trivial to getting started with, mainly because documentation seems a little outdated.

So these are my instructions for making synch tests of your RPC services, using eclipse and google eclipse  plugin.

A summary of the entire procedure:
  1. create a new GWT Application project using eclipse New Application project wizard code template that comes with an example RPC service to test against to. This will be our "target" GWT application which we want to test.
  2. create a (second) eclipse Java Project, add syncproxy.jar and previous "target" GWT project to its build path. 
  3. create a JUnit  TestCase class in the test project that calls the target service class synchronously. The test app is a java client that tests against the "target" running GWT application.

First of all, I suppose you already have a GWT application which GWT services you wish to write tests for. If you don't just create a new GWT Web Applicaiton project with asking the wizard to create the template project that contains an already running RPC service for testing. That is what we will use in this example, so

Step 1 (optional): create a GWT project with a RPC service to test. 

Go to File -> New -> Other... -> Google -> Web Application Proje. Unselect Support for appengine and make sure "Generate sample code" is checked: 


Press Finnish and test the new application if you want. In my case I named it "Gwtrpcapp1" so I right click the file /war/Gwtrpcapp1.html -> Debug as .. -> Web Application . After is loaded, open the url http://127.0.0.1:8888/Gwtrpcapp1.html?gwt.codesvr=127.0.0.1:9997 in your browser.

This project cointains a RPC service called "greet". The data that we need from this RPC service are its module base url ("http://127.0.0.1:8888/gwtrpcapp1/") and the name of the service that we wish to test ("greet"). I found these values using Firefox's Firebug extension for examining HTTP request of our app:


Step 2: Create your test project


We will create a second project containing our junit tests. We choose a second project but if you are familiar with the tools you should not have major problems for putting these tests inside the same GWT project. In this case go to File -> New -> Java -> Java Project and create one. In my case I named it "Gwtrpcapp1Test1".

Now let's configure it a little this new project, first of all add the our target GWT project to its java class path. Right click project "Gwtrpcapp1Test1" -> Build Path -> Configure build Path -> Projects -> Add.. and choose our  target in my case "Gwtrpcapp1".

Also download syncproxy.jar from http://code.google.com/p/gwt-syncproxy/downloads/list,. copy syncproxy.jar file inside project "Gwtrpcapp1Test1", and add it to its class path.

Also you will need to add gwt-servlet.jar to your test project build path. Just go to Configure build path -> Libraries -> Add jars and choose the file  gwtrpcapp1/war/WEB-INF/lib/gwt-servlet.jar.


Now create some java package to work and create a Junit Test right clicking the package -> New .. -> Other -> Java -> JUnit -> JUnit Test Case. Eclipse will ask permission for adding JUnit library in your project. Complete some simple test there:

package org.sgx.gwtrpcapp1.test;

import static org.junit.Assert.*;

import org.junit.Test;
import org.sgx.gwtrpcapp1.client.GreetingService;

import com.gdevelop.gwt.syncrpc.SyncProxy;
/**
 * test for GreetingService - url : http://127.0.0.1:8888/gwtrpcapp1/greet 
 * @author sg
 *
 */
public class GreetingServiceTest1 {
 private static final String MODULE_BASE_URL = "http://127.0.0.1:8888/gwtrpcapp1/";
 private static final String SERVICE_NAME = "greet"; 
  
 private static GreetingService greetingService = (GreetingService) SyncProxy
  .newProxyInstance(GreetingService.class, MODULE_BASE_URL, SERVICE_NAME);

 @Test
 public void test() {
  System.out.println(greetingService.greetServer("Sebastian"));
  assertTrue(greetingService.greetServer("Sebastian").startsWith("Hello, Sebastian!"));    
 }
}

Important:  For this to work, all the classes that you want to pass / return from RPC methods must implement the com.google.gwt.user.client.rpc.IsSerializable interface.

 Run the test


If everything was fine, first run the target GWT Application like I told you before, and after its loads complete, run the our JUnit test. For that just right click GreetingServiceTest1 file -> Run as -> JUnit Test Voila! Hope this can be helpful to others in a similar situation.

Google AppEngine DataStore

If you are testing RPC services that perform some CRUD operations in Google Appengine DataStore these few tips could be helpful. Also this apply for frameworks that run on top of appengine datastore, like objectify.

The datastore it self is not synchronically: it takes some seconds to really impact changes to the datastore. So for example, if in our synchronous JUnit tests we save an entity it could not be available yet in the next data query. The same for deletion, it takes aprox 5 seconds to the datastore to really impact the entity deletion.

This is bad for our synchronous JUnit tests where we want the changes to impact synchronously. Fortunately, it is easy to configure the appengine in devmode for the datastore to behave synchronously. Just go to your appengine project launch configuration -> Appengine and edit the "unapplied job percentage" value to a very small number like 0.001:

Now your datastore will behave synchronously (at least almost all the time).

Also, I successfully run this test against my application deployed on appspot.com. I thought the test will fail because the weak consistence nature of the datastore, but surprisely, the test finnish without errors. Coud this be because of my slow intenret connection. Or, more worry, could this be because my eclipse application launcher configuration is somehow deplyed also ? ... mmm will have to investigate...

miércoles, 10 de octubre de 2012

Developing a vaadin application for Google appengine in eclipse.

Developing a vaadin application for Google appengine in eclipse. 


This is a step by step tutorial about making a vaadin application that runs on top of google appengine.

vaadin supports google appengine as a server backend as it is documented in the vaadin book. Also the vaadin eclipse plugin comes with a eclipse project wizard for building a web application based on vaadin and GAE. However, the resulting application do not support the GAE runtime and as a result, the GAE developemtn mode cannot be used (for testing the GAE application locally before deploying it to the web).

In this tutorial, we will generate such an application and change it for supporting GAE runtime and so being able of testing the app locally. The idea is to do agile development (save a file change, and only need to refresh the web page for reflecting the changes, no server restart)

So let's begin, we will use eclipse 4.2, java 1.6, Google appengine (GAE) 1.7.1, vaadin 6.8.4. OS: linux . Also this has been tested on eclipse 3.7.

1) Install Google Plugin for Eclipse. You can use eclipse marketplace at Help -> Marketplace for easy find and install this plugin.

2) Install Vaadin Plugin for Eclipse. You can use eclipse marketplace at Help -> Marketplace for easy find and install this plugin.

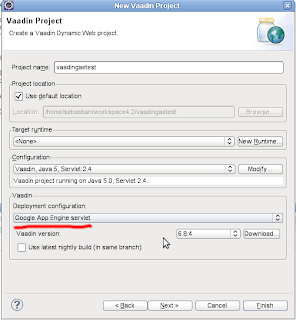
3) Create a new vaadin project. Just go to File -> New -> Other -> Vaadin -> Vaadin project. Make sure you set "Deployment configuration" to "Google App Engine servlet". You can leave all the other options to their default values. For this example, we left "Create project template" checked because we want something to test right away.

Also notice that we leave the target runtime empty: we don't want to run this application on tomcat or some other Java container but using the GAE runtime. In this example we named the project "vaadingaetest".  This project is ready for being deployed on GAE, but we cannot use the GAE runtime locally for testing and working, that is what the following steps are for.


4) Edit the project's .project file. You may need to go to eclipse's Navigator view for locating it because it is hidden in most other views. Once you have opened it, we need to add the XML element com.google.appengine.eclipse.core.gaeNature inside the element. you should end with something like this:
<natures>
 <nature>com.google.appengine.eclipse.core.gaeNature</nature>
 <nature>org.eclipse.jem.workbench.JavaEMFNature</nature>
 <nature>org.eclipse.wst.common.modulecore.ModuleCoreNature</nature>
 <nature>org.eclipse.wst.common.project.facet.core.nature</nature>
 <nature>org.eclipse.jdt.core.javanature</nature>
 <nature>com.vaadin.integration.eclipse.widgetsetNature</nature>
 <nature>org.eclipse.wst.jsdt.core.jsNature</nature>
</natures>


5) Enable the GAE runtime in the project. This is simply a matter of adding the GAE library to the project. Right click on the project name in the project explorer -> Build Path -> Add Libraries and there choose "google app engine" and use the default SDK. If you have not an GAE SDK installed, install it (you can ask eclipse to download it for you). Also you may need to give the GAE library more preference than other libraries. Just right click the project -> Build path -> Configure build path -> Order and export and there select the "appengine SDK" entry on the list and press the Up button for increasing the priority of this library like showed on the following image:


6) Fix the file war/WEB-INF/appengine-web.xml adding the following element inside. For some reason this geerated file won't work without that line.

true

And that's all the configuration needed! Now let's run our vaading application using the GAE runtime locally.

7) Run our vaadin application on GAE runtime. For this, make sure you have refreshed the project and then right click the project name -> Debug As -> Web Application. Note: if there is no Web Application option this means you have done something wrong in steps 4 or 5. Try to refresh your project and make sure you are working in Java Porject Explorer eclipse view.

8) Test your application, open http://localhost:8888/?restartApplication in your browser and you should see your vaadin app. Now, let's modify something on file /vaadingaetest/src/com/example/vaadingaetest/VaadingaetestApplication.java, for example, change the label value like:

Label label = new Label("Hello Vaadin eclipse and appengine user!");

Save the java file and you should see your changes reflected just refreshing your browser window with F5 key.

A little explanation: In a vaadin application we do not have jsps or html pages, but servlets that are responsible for render our app. Because in the project creation wizard we left "Create project template" checked, the wizard has created a sample application for us that we can run and in our case this servlet class is com.example.vaadingaetest.VaadingaetestApplication. Also looking at the created web descriptor (file /war/WEB-INF/web.xml) we can see that the servlet is mapped to the URL pattern "/*", this means accessing http://localhost:8888/anythinghere will render our vaading application (a servlet).

Also, notice that I used the ?restartApplication http parameter. This tells vaadin framework to automatically apply changes in the java code without having to restart the container something very appreciated when developing.


Well, hope this can serve others eclipse vaading and google app engine users to getting started with these technologies.

jueves, 9 de agosto de 2012

YUIGWT

YUIGWT

 A Java GWT API for the great JavaScript YUI lirary

Project home page: http://code.google.com/p/yuigwt/ 

Example Gallery with online Java sources : http://cancerbero.vacau.com/yuigwt/

The project is very very new, but a general pattern for migrating all the YUI JavaScript API to Java was found, using 100% GWT Overlay types for a zero overhead Java API. A lot of components are already ready to be used, check the example gallery that will reflect current progress.

viernes, 20 de julio de 2012

HTML Minimizator

I had to develop my own HTML code minimization application for my own specific needs, and here I would like to share the experience with the public.I called HTML minimizator and it is available online at htmlminimizator online web page.

A little background - while developing javascvript toolkits porting to Java GWT or to Java2Script frameworks I often need to copy javascript documentation to my javadocs classes comments for documenting java methods or classes that correspond to some javascript function or object.

For this I can copy the HTML sources of the javascript toolkit's documentation,
and paste it directly into the javadoc and it will look the same in generated html javadocs. This is really usefull and let me copy directly from the javascript toolkit documentation htmls.

For this, I want the javadoc size to be the minimun as possible and also I need to erase ALL html attributes like ids, hrefs, etc. Also I would like to eliminate any empty elements

That is what this little application HTML Minimizator try to do. It is a small GWT appilcation that let you paste XML valid code fragment, configure a little options and then get the minimified HTML.

I know there are a lot of HTML minimizators on the web, but none of them do an acceptable work for me, most of all because they won't eliminate attributes.

The project is hosted at https://code.google.com/p/gwteditors/ svn, since it uses my project gwteditors and it is very little for its own project.

For example, for default configuration, an html code like this:

< p>< code>Shape< /code> has the following implementations based on browser capability.< /p>

< ul id="yui_3_5_1_1_1342815626205_173">
    < li>< a href="SVGShape.html">< code>SVGShape< /code>< /a>< /li>
    < li id="yui_3_5_1_1_1342815626205_172">< a id="yui_3_5_1_1_1342815626205_171" href="VMLShape.html">< code>VMLShape< /code>< /a>< /li>
    < li>< a href="CanvasShape.html">< code>CanvasShape< /code>< /a>< /li>
< /ul>
will be minimized to the following html code:
< p>< code>Shape< /code> has the following implementations based on browser capability.< /p>< ul>< li>< a>< 
code>SVGShape< /code>< /a>< /li>< li>< a>< code>VMLShape< /code>< /a>< /li>< li>< a><
 code>CanvasShape< /code>< /a>< /li>< /ul>

martes, 20 de diciembre de 2011

Example on how easily a javascript native component can be embedded natively in an gwt widget

I needed to use a wysiwyg editor in my gwt application. Tried some sollutions, but none worked, so I decided to develop a gwt widget with ckeditor inside, and with support for gwt editor framework.

In the following example, I will create an html file that loads ckeditor javascript before the gwt application javascript is loaded:


<!doctype html>

<html>
<head>
<meta http-equiv="content-type" content="text/html; charset=UTF-8">

<title>Web Application Starter Project</title>

<script type="text/javascript" language="javascript"
src="js/ckeditor/ckeditor.js"></script>

</head>

<body>

<script type="text/javascript" language="javascript"
src="circulares2/circulares2.nocache.js"></script>

<div id="uniqueID"></div>

</body>
</html>


Then the following is the code for the ckeditor gwt widget, with support for gwt editor framework:


package com.beeblos.portlet.circulares2.gwt.client.util;

import com.google.gwt.dom.client.Document;
import com.google.gwt.dom.client.Style.Display;
import com.google.gwt.dom.client.Style.Unit;
import com.google.gwt.dom.client.TextAreaElement;
import com.google.gwt.editor.client.LeafValueEditor;
import com.google.gwt.user.client.ui.SimplePanel;
import com.google.gwt.user.client.ui.TextArea;

/**
* ckeditor.js must be already loaded, put it in .
* @author sg
*
*/
public class CKEditor extends SimplePanel implements LeafValueEditor {

String _id=null;
private String text;
private TextAreaElement ta;
static Integer idCounter=0;

public CKEditor(String text) {
idCounter++;
_id="ckEditorWidget_"+idCounter;
this.text=text;

initGui();
}

private void initGui() {
ta = Document.get().createTextAreaElement();
ta.getStyle().setWidth(100, Unit.PCT);
ta.getStyle().setHeight(100, Unit.PCT);
ta.setId(_id);
getElement().appendChild(ta);
}

@Override
public void setValue(String value) {
this.text=value;
this._setText(_id, value);
}
@Override
public String getValue() {
return _getText(_id)+"";
}
protected native void _setText(String id, String value)/*-{
if($wnd.CKEDITOR && $wnd.CKEDITOR.instances && $wnd.CKEDITOR.instances[id])
$wnd.CKEDITOR.instances[id].setData(value);
}-*/;
protected native Object _getText(String id) /*-{
if(!$wnd.CKEDITOR || !$wnd.CKEDITOR.instances || !$wnd.CKEDITOR.instances[id])
return "";
else
return $wnd.CKEDITOR.instances[id].getData();
}-*/;

@Override
protected void onLoad() {
super.onLoad();
_loadCKEditor(_id, getCkEditorConfig());
ta.getStyle().setDisplay(Display.NONE);
if(Util.notNull(text))
this._setText(_id, text);
}

protected native Object getCkEditorConfig() /*-{
return {
toolbar : 'Basic',
uiColor : '#9AB8F3'
};
}-*/;

private static native void _loadCKEditor(String id, Object config) /*-{
$wnd.CKEDITOR.replace(id, config);
}-*/;
}


Note how I use the gwt widget's onLoad for loading native ckeditor inside the widget, because I need gwt to be fully loaded before adding native ckeditor. Also, note that you can extend this class for indicating a custom ckeditor configuration, for example:


public class CkEditorNormal extends CKEditor {
public CkEditorNormal(String text) {
super(text);
}

protected native Object getCkEditorConfig() /*-{
return {};
}-*/;
}


Hope this helps somebody to develop / integrate its own javascript toolkits as gwt widgets or in gwt projects.

lunes, 19 de diciembre de 2011

gwt editor framework, 100% java example

I'm learning gwt, and found gwt editor framework and it seems very promising technology for doing gui. Nevertheless, there are little documentation available for gwt begginers, and all the examples uses gwt UIBinder, which I'm not.


So, this is a gwt module file, that contains a simple model class, a simple gwt editor for that model class, and a example of using it for displaying and let the user edit the model. No UIBinder, all the GUI was made in java using gwt eclipse editor. Enjoy!


package com.beeblos.portlet.circulares2.gwt.client;

import com.google.gwt.core.client.*;
import com.google.gwt.editor.client.*;
import com.google.gwt.event.dom.client.*;
import com.google.gwt.user.client.Window;
import com.google.gwt.user.client.ui.*;

/**
* entry point testing gwt editor framework. 100% java code, no UIBinder...
* @author: sgurin
*/
public class Circulares2 implements EntryPoint {


public static class Person {
String name;
Integer age;
public Person(String name, Integer age) {
super();
this.name = name;
this.age = age;
}
public String getName() {
return name;
}
public void setName(String name) {
this.name = name;
}
public Integer getAge() {
return age;
}
public void setAge(Integer age) {
this.age = age;
}
}

/**
* the perdon's editor. Note that it has 2 non private attributes with the exact name
* as the Person's attributes.
*
* @author sg
*
*/
public class PersonEditor extends SimplePanel implements Editor {
TextBox name;
IntegerBox age;

public PersonEditor() {
Grid grid = new Grid(2, 2);
setWidget(grid);
grid.setSize("100%", "100%");

Label lblNewLabel = new Label("name");
grid.setWidget(0, 0, lblNewLabel);

name = new TextBox();
grid.setWidget(0, 1, name);

Label lblAge = new Label("age");
grid.setWidget(1, 0, lblAge);

age = new IntegerBox();
grid.setWidget(1, 1, age);
}
}

// Empty interface declaration, similar to UiBinder
interface Driver extends SimpleBeanEditorDriver {}


public void onModuleLoad() {

/* this is the main entry point of our gwt application.
* Here we instance the editor (a gwt panel), a sample
* instance object (a person) and a editor driver, the
* object that will let us link the data with the editor */

RootPanel rootPanel = RootPanel.get("uniqueID");


// Create the editor's Driver
final Driver driver = GWT.create(Driver.class);

//create a sample model object
Person p = new Person("john", 22);

// PersonEditor is a DialogBox that extends Editor
PersonEditor editor = new PersonEditor();
// Initialize the driver with the top-level editor
driver.initialize(editor);
// Copy the data in the object into the UI
driver.edit(p);

//at this point the editor panel is loaded with the person...

VerticalPanel vp = new VerticalPanel();
vp.setSize("100%", "100%");
rootPanel.add(vp);

Button editButton = new Button("edit", new ClickHandler() {
@Override
public void onClick(ClickEvent event) {
//we get the edited person object back
Person editedPerson = driver.flush();
Window.alert("edited person name: "+editedPerson.getName());
}
});
vp.add(editor);
vp.add(editButton);
}
}