Mostrando entradas con la etiqueta eclipse. Mostrar todas las entradas

miércoles, 10 de octubre de 2012

Developing a vaadin application for Google appengine in eclipse.

Developing a vaadin application for Google appengine in eclipse. 


This is a step by step tutorial about making a vaadin application that runs on top of google appengine.

vaadin supports google appengine as a server backend as it is documented in the vaadin book. Also the vaadin eclipse plugin comes with a eclipse project wizard for building a web application based on vaadin and GAE. However, the resulting application do not support the GAE runtime and as a result, the GAE developemtn mode cannot be used (for testing the GAE application locally before deploying it to the web).

In this tutorial, we will generate such an application and change it for supporting GAE runtime and so being able of testing the app locally. The idea is to do agile development (save a file change, and only need to refresh the web page for reflecting the changes, no server restart)

So let's begin, we will use eclipse 4.2, java 1.6, Google appengine (GAE) 1.7.1, vaadin 6.8.4. OS: linux . Also this has been tested on eclipse 3.7.

1) Install Google Plugin for Eclipse. You can use eclipse marketplace at Help -> Marketplace for easy find and install this plugin.

2) Install Vaadin Plugin for Eclipse. You can use eclipse marketplace at Help -> Marketplace for easy find and install this plugin.

3) Create a new vaadin project. Just go to File -> New -> Other -> Vaadin -> Vaadin project. Make sure you set "Deployment configuration" to "Google App Engine servlet". You can leave all the other options to their default values. For this example, we left "Create project template" checked because we want something to test right away.

Also notice that we leave the target runtime empty: we don't want to run this application on tomcat or some other Java container but using the GAE runtime. In this example we named the project "vaadingaetest".  This project is ready for being deployed on GAE, but we cannot use the GAE runtime locally for testing and working, that is what the following steps are for.


4) Edit the project's .project file. You may need to go to eclipse's Navigator view for locating it because it is hidden in most other views. Once you have opened it, we need to add the XML element com.google.appengine.eclipse.core.gaeNature inside the element. you should end with something like this:
<natures>
 <nature>com.google.appengine.eclipse.core.gaeNature</nature>
 <nature>org.eclipse.jem.workbench.JavaEMFNature</nature>
 <nature>org.eclipse.wst.common.modulecore.ModuleCoreNature</nature>
 <nature>org.eclipse.wst.common.project.facet.core.nature</nature>
 <nature>org.eclipse.jdt.core.javanature</nature>
 <nature>com.vaadin.integration.eclipse.widgetsetNature</nature>
 <nature>org.eclipse.wst.jsdt.core.jsNature</nature>
</natures>


5) Enable the GAE runtime in the project. This is simply a matter of adding the GAE library to the project. Right click on the project name in the project explorer -> Build Path -> Add Libraries and there choose "google app engine" and use the default SDK. If you have not an GAE SDK installed, install it (you can ask eclipse to download it for you). Also you may need to give the GAE library more preference than other libraries. Just right click the project -> Build path -> Configure build path -> Order and export and there select the "appengine SDK" entry on the list and press the Up button for increasing the priority of this library like showed on the following image:


6) Fix the file war/WEB-INF/appengine-web.xml adding the following element inside. For some reason this geerated file won't work without that line.

true

And that's all the configuration needed! Now let's run our vaading application using the GAE runtime locally.

7) Run our vaadin application on GAE runtime. For this, make sure you have refreshed the project and then right click the project name -> Debug As -> Web Application. Note: if there is no Web Application option this means you have done something wrong in steps 4 or 5. Try to refresh your project and make sure you are working in Java Porject Explorer eclipse view.

8) Test your application, open http://localhost:8888/?restartApplication in your browser and you should see your vaadin app. Now, let's modify something on file /vaadingaetest/src/com/example/vaadingaetest/VaadingaetestApplication.java, for example, change the label value like:

Label label = new Label("Hello Vaadin eclipse and appengine user!");

Save the java file and you should see your changes reflected just refreshing your browser window with F5 key.

A little explanation: In a vaadin application we do not have jsps or html pages, but servlets that are responsible for render our app. Because in the project creation wizard we left "Create project template" checked, the wizard has created a sample application for us that we can run and in our case this servlet class is com.example.vaadingaetest.VaadingaetestApplication. Also looking at the created web descriptor (file /war/WEB-INF/web.xml) we can see that the servlet is mapped to the URL pattern "/*", this means accessing http://localhost:8888/anythinghere will render our vaading application (a servlet).

Also, notice that I used the ?restartApplication http parameter. This tells vaadin framework to automatically apply changes in the java code without having to restart the container something very appreciated when developing.


Well, hope this can serve others eclipse vaading and google app engine users to getting started with these technologies.

miércoles, 20 de mayo de 2009

Cómo hacer que eclipse se vea mejor en linux


Plase translate this article to your favorite language:


Una de las principales incomodidades de eclipse para linux es el desperdicio de espacio (principalmente vertical). Comparemos a continuación la versión de windows y la versión de linux. Observemos en particular, como la versión de windows es capaz de mostrar muchísima más información en la vista package explorer que la versión de linux:

eclispe para linux (sin ajustes)


eclipse para windows:
Para proyectos grandes, con muchos recursos, este desperdicio de espacio es bastante molesto ya que cuanto más se tenga que hacer scroll para encontrar un recurso, más se distrae uno. Además de las vistas en forma de árbol como la package explorer, navigator, ant, outline, etc, en mi opinión eclipse para linux también desperdicia mucho espacio horizontal en los botones de la barra de herramientas, menu, etc.

Lamentablemente, las preferencias de eclipse no permiten cambiar la fuente, ni el espaciado de los elementos de este tipo de componentes. Sin embargo, dado de que en linux, SWT (el toolkit gráfico utilizado por eclipse) se basa en los widgets de gtk+ lo que sí podemos hacer es personalizar la theme gtk de forma de solucionar esto.

La forma más fácil de hacer esto es editando el archivo ~/.gtkrc-2.0 con el siguiente contenido:

style "gtkcompact" {
font_name="Sans 8"
GtkButton::default_border={0,0,0,0}
GtkButton::default_outside_border={0,0,0,0}
GtkButtonBox::child_min_width=0
GtkButtonBox::child_min_heigth=0
GtkButtonBox::child_internal_pad_x=0
GtkButtonBox::child_internal_pad_y=0
GtkMenu::vertical-padding=1
GtkMenuBar::internal_padding=0
GtkMenuItem::horizontal_padding=4
GtkToolbar::internal-padding=0
GtkToolbar::space-size=0
GtkOptionMenu::indicator_size=0
GtkOptionMenu::indicator_spacing=0
GtkPaned::handle_size=4
GtkRange::trough_border=0
GtkRange::stepper_spacing=0
GtkScale::value_spacing=0
GtkScrolledWindow::scrollbar_spacing=0
GtkExpander::expander_size=10
GtkExpander::expander_spacing=0
GtkTreeView::vertical-separator=0
GtkTreeView::horizontal-separator=0
GtkTreeView::expander-size=8
GtkTreeView::fixed-height-mode=TRUE
GtkWidget::focus_padding=0
}
class "GtkWidget" style "gtkcompact"

style "gtkcompactextra" {
xthickness=0
ythickness=0
}
class "GtkButton" style "gtkcompactextra"
class "GtkToolbar" style "gtkcompactextra"
class "GtkPaned" style "gtkcompactextra"

Básicamente, las expresiones que comienzan con "style" son reglas de estilo, mientras que las expresiones que comienzan con "class" aplican una regla de estilo a algún tipo de widget gtk. Luego de este cambio, al iniciar eclipse se ve prácticamente con el mismo espaciado que la versión de windows:


Notar que particularmente el problema es que todas las themes gtk que comunmente vienen instaladas dejan demasiado espacio (en el contexto de un programador) entre items del widget Tree de gtk (GtkTreeView).

Este pequeño cambio hace, en mi opinión, 100% más utilizable a eclipse en linux.

.... Y los años transcurrieron y esta información sigue siendo relevante para eclipse 4.3 en linux arch, y especialmente más útil ahora que eclipse 4.X desperdicia muchísimo más espacio, veamos el antes y después:
Antes: 

Después:


Notar la gran diferencia de ahorro de espacio en la tool bar superior y en el árbol de trabajo de la izquierda.BTW - at least in arch linux -  you can modify the file /home/sg/.gtkrc-2.0.mine instead original and often auto generated /home/sg/.gtkrc-2.0

martes, 31 de marzo de 2009

Developing and debugging web applications in eclipse and tomcat

Point tomcat to our web applications sources and debug them in eclipse


Ok this is my situation. I like to program my java web app applications inside some ide like eclipse or netbeans and test them in tomcat. The idea is that tomcat take its resources directly from the eclipse workspace so just saving a file (like a jsp, .java, etc) will instantly apply the changes. Also we will be able to debug our web application java code.

Personally, I like to have my tomcat clean and under control, so I am not a fan of "web development tools" that came with these IDEs.

So, the main idea is for one side, having one project in the IDE with the entire web application resources (java, jsp, xml) and for the other side we will work with a tomcat which have defined a web application that points directly to the eclipse project resources. When we finnish, we will be able to:
  • Have all our web application in one eclipse project.
  • Simply saving modified .java or .jsp resources will impact inmediately the changes in a running application.
  • Debug java code inside eclipse while the web application is running, both in .java and .jsp files.
I will explain how to configure the web applications project inside the eclipse ide.

1) Create an eclipse java project. I suppose you will have one or more java source folders with your application logic, persistence classes, etc.

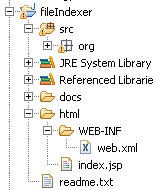
2) Define a directory for your webapp. Inside the created eclipse project define a directory that will contain exactly the files needed by your webapp application (the files that will be stored in $TOMCAT/webapp/$YOUR_WEBAPP_NAME). This means that your .jsps, WEB-INF/web.xml, WEB-INF/classes, META-INF/ will be here. Later, we will point tomcat to this directory so it will read the resources stored in this.

In my little application I named it /html/ and need to create /html/WEB-INF/web.xml, /html/classes.

3) Output .class files to your webapp dir. We must tell eclipse to put all .class generated files to /html/WEB-INF/classes. For this you have to, in each of your source folders, right click the source folder -> Build bath -> Configure output folder, choose "Specific output folder..." and enter html/WEB-INF/classes.

4) Point tomcat to the project resources. All we need now is to create a tomcat web application that points to our $ECLIPSE_PROJECT/html directory. The best way I found in Tomcat (5.x and 6.x) for doing this is creating the file $TOMCAT/conf/$ENGINENAME/$HOSTNAME/$YOUR_WEBAPP_NAME.xml with the following content:

docBase="$ECLIPSE_PROJECT/html">

in my example I had to create the file C:\apache-tomcat-5.5.27\conf\Catalina\localhost\fileIndexer.xml
with the following content:


docBase="C:\dev\workspace\fileIndexer\html">

If your application needs it, more information can be added to this context file.

5) Libraries. You will have to put all yout java libraries (.jar) in /html/WEB-INF/lib directory for making them available to the tomcat web app.

6) java compiler. We rest only one thing to do and is to be sure that tomcat and eclipse are using the same jre, and that eclipse is generating the propert version .class files. Tomcat uses the jre defined by the environment variable JAVA_HOME and prints to the console which jre is using like:

Using JRE_HOME: C:\Java\jdk1.5.0_15

So one thing we can do is, in eclipse Window->preferences->java->Installed JREs make sure to select the same jre tomcat's using and in Window->preferences->java->Compiler choose a java compliance level supported by that jre.

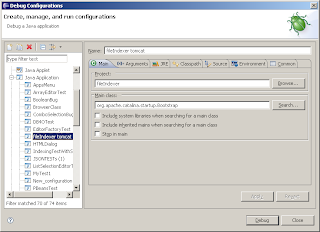
7) debuggin java in eclipse. Basically we will configure eclipse so tomcat is launched as a eclipse application. In eclipse go to : Run->"Debug configurations..." (or "Open debug dialog..." in 3.3 and previous eclipse versions). There create a new java application launcher, name it appropiately, and in the Main tab select your eclipse project and specify "org.apache.catalina.startup.Bootstrap" as Main class:

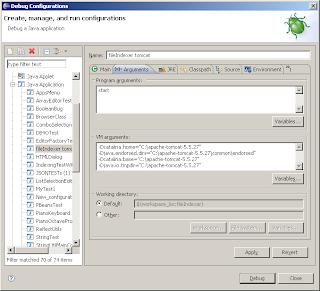
Now, in "Arguments" write "start" in Program arguments and something like the following (change it according to your installation):

-Dcatalina.home="C:\apache-tomcat-5.5.27" -Djava.endorsed.dirs="C:\apache-tomcat-5.5.27\common\endorsed" -Dcatalina.base="C:\apache-tomcat-5.5.27"
-Djava.io.tmpdir="C:\apache-tomcat-5.5.27"

Now, "add the external Jar" $TOMCAT/bin/bootstrap.jar in User entries, like in:


and last, in "Source" tab add your java project. Click in "Apply" to save and click "debug" for launching tomcat in debug mode.

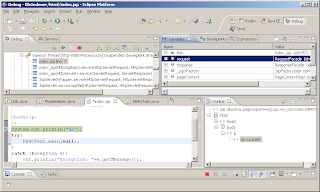
Breakpoints in your .java files, or even in you .jsp's java scriptlets will pause the web user requests and open the debug perspective. Try for example, adding a breakpoint in some java code of one of yours jsps, "debug as" your tomcat using the created eclipse java app launch configuration, point the browser to the later jsp and eclipse must pause the thread in debug perspective: