sábado, 20 de junio de 2009

java2script SWT portlets

author: Sebastián Gurin
Añadir vídeo
In this document I will try to explain how to make a simple jsp portlet with a java2script swt application as its contents. We will use liferay portal for testing it. You can download the portlet WAR file and project sources from java2script group files . the file is called MyJ2sPortlet.war

This is not a tutorial neither of swt gui applications, portlets, or client-server application. Here I will only show what is the best way, IMHO, of showing a swt shell as a portlet..

If you want to test this portlet you only need to download liferay portal. If you want to import this as an eclipse project and make your own swt portlet you will have to be familiarized with portlet development and java2script.

In the first place I developed a simple swt application using my favorite visual editor in eclipse. In gnome it looks like the following:


We want to render it as a portlet. In this solution, the resulting portlet (with red halo) will be:

In the following picture we use liferay freeform layout. Observe that the shell will expand accordingly to the portlet size:


deploying the portlet to liferay for testing

The .war file is a web application portlet archive ready for deploy in a portal application. For testing the .war portlet in liferay you must:

  1. download liferay-bundled-with-tomcat, for example liferay 4.4.1 bundled with tomcat 5.5 http://sourceforge.net/project/downloading.php?group_id=49260&filename=liferay-portal-tomcat-5.5-4.4.1.zip&a=34438561

  2. run bin/startup,

  3. login as test@liferay.com password “test”.

  4. copy myJ2sPortlet.war to /home/yourusername/liferay/deploy (or in the case of windows something like c:\Documents and settings\Users\yourusername\liferay\deploy).

  5. Wait until liferay console prints “22:43:54,308 INFO [PortletHotDeployListener:425] Portlets for myJ2sPortlet registered successfully”

  6. Click on “welcome test!” → add application → java2script → myj2sportlet and the portlet should be added to the page

In the 4 step is where we actually make the portlet hot deploy in liferay. Alternatively, you can install de portlet from inside the portal. Just open Admin->admin liferay portlet, click "plugins" tab, click "install more plugins", click "upload file" tab, and choose MyJ2sPortlet.war. Once this step is finnished, liferay console should print somethings like the following telling us the portlet was successfully deployed:

13:06:38,595 INFO [BaseDeployer:493] Deploying myJ2sPortlet.war
Expanding: /home/sebastian/beeblos4/deploy/myJ2sPortlet.war into /tmp/20090621130638598
Copying 1 file to /tmp/20090621130638598/WEB-INF
13:06:39,230 INFO [BaseDeployer:1132] Modifying Servlet 2.5 /tmp/20090621130638598/WEB-INF/web.xml
Copying 735 files to /home/sebastian/desarrollo/portal4/tomcat/webapps/myJ2sPortlet
Copied 76 empty directories to 3 empty directories under /home/sebastian/desarrollo/portal4/tomcat/webapps/myJ2sPortlet
Copying 1 file to /home/sebastian/desarrollo/portal4/tomcat/webapps/myJ2sPortlet
Deleting directory /tmp/20090621130638598
13:06:40,151 INFO [PortletAutoDeployListener:87] Portlets for /home/sebastian/beeblos4/deploy/myJ2sPortlet.war copied successfully
13:06:43,934 INFO [PluginPackageHotDeployListener:74] Reading plugin package for myJ2sPortlet
13:06:43,935 WARN [PluginPackageHotDeployListener:123] Plugin package on context myJ2sPortlet cannot be tracked because this WAR does not contain a liferay-plugin-package.xml file
13:06:44,506 INFO [PluginPackageHotDeployListener:187] Plugin package myJ2sPortlet/myJ2sPortlet/unknown/war registered successfully
13:06:44,511 INFO [PortletHotDeployListener:133] Registering portlets for myJ2sPortlet
13:06:44,600 INFO [PortletHotDeployListener:425] Portlets for myJ2sPortlet registered successfully

Note that the portlet is not deployed until liferay prints " Portlets for myJ2sPortlet registered successfully"

Steps I followed for creating the project

The .war file is a zip and contains both binary (.class and .js) and source code (java). in src/ directory you can find portlet and servlet code and in /html/myJ2s_j2sproject/src-j2s it is the swt shell java sources.

I recommend you to decompress it and import the project to eclipse. This is a “portlet project” and you can easily build, package and deploy on liferay via a simple ant script (configure build.properties according to your system).

In summary this web application serve the java2script content statically and once deployed it still can be accessed from outside the portal application , for example from http://localhost:8080/myJ2sPortlet/html/myJ2s_j2sproject/org.sgx.portlet.myJ2sPortlet.gui.Dialog1.html

For one side, we have an html and javascript files generated by java2script that will render a maximized swt shell:

dialogShell = new Shell(parent, SWT.NONE);

//.... initialize shell content......

dialogShell.layout();

dialogShell.pack();

dialogShell.open();

dialogShell.setMaximized(true);

Display display = dialogShell.getDisplay();

while (!dialogShell.isDisposed()) {

if (!display.readAndDispatch())

display.sleep();

}

(see Dialog1.java)

in the other side, out portlet contents will be a maximized iframe which points to the static content. Portlet's View.jsp:

<%@page contentType="text/html"%>

<%@page pageEncoding="UTF-8"%>

<iframe height="100%" width="100%" src="/myJ2sPortlet/html/myJ2s_j2sproject/org.sgx.portlet.myJ2sPortlet.gui.Dialog1.html"/>

Having java2script application in a separate iframe (and thus in a separate dom) will prevent to have nasty javascript libraries incompatibilities. Also we took advantage of swt shell maximization for the portlet content size adjustment.

Hope this can be useful for people who wish to experiment with java2script applications inside portals.


miércoles, 20 de mayo de 2009

Cómo hacer que eclipse se vea mejor en linux


Plase translate this article to your favorite language:


Una de las principales incomodidades de eclipse para linux es el desperdicio de espacio (principalmente vertical). Comparemos a continuación la versión de windows y la versión de linux. Observemos en particular, como la versión de windows es capaz de mostrar muchísima más información en la vista package explorer que la versión de linux:

eclispe para linux (sin ajustes)


eclipse para windows:
Para proyectos grandes, con muchos recursos, este desperdicio de espacio es bastante molesto ya que cuanto más se tenga que hacer scroll para encontrar un recurso, más se distrae uno. Además de las vistas en forma de árbol como la package explorer, navigator, ant, outline, etc, en mi opinión eclipse para linux también desperdicia mucho espacio horizontal en los botones de la barra de herramientas, menu, etc.

Lamentablemente, las preferencias de eclipse no permiten cambiar la fuente, ni el espaciado de los elementos de este tipo de componentes. Sin embargo, dado de que en linux, SWT (el toolkit gráfico utilizado por eclipse) se basa en los widgets de gtk+ lo que sí podemos hacer es personalizar la theme gtk de forma de solucionar esto.

La forma más fácil de hacer esto es editando el archivo ~/.gtkrc-2.0 con el siguiente contenido:

style "gtkcompact" {
font_name="Sans 8"
GtkButton::default_border={0,0,0,0}
GtkButton::default_outside_border={0,0,0,0}
GtkButtonBox::child_min_width=0
GtkButtonBox::child_min_heigth=0
GtkButtonBox::child_internal_pad_x=0
GtkButtonBox::child_internal_pad_y=0
GtkMenu::vertical-padding=1
GtkMenuBar::internal_padding=0
GtkMenuItem::horizontal_padding=4
GtkToolbar::internal-padding=0
GtkToolbar::space-size=0
GtkOptionMenu::indicator_size=0
GtkOptionMenu::indicator_spacing=0
GtkPaned::handle_size=4
GtkRange::trough_border=0
GtkRange::stepper_spacing=0
GtkScale::value_spacing=0
GtkScrolledWindow::scrollbar_spacing=0
GtkExpander::expander_size=10
GtkExpander::expander_spacing=0
GtkTreeView::vertical-separator=0
GtkTreeView::horizontal-separator=0
GtkTreeView::expander-size=8
GtkTreeView::fixed-height-mode=TRUE
GtkWidget::focus_padding=0
}
class "GtkWidget" style "gtkcompact"

style "gtkcompactextra" {
xthickness=0
ythickness=0
}
class "GtkButton" style "gtkcompactextra"
class "GtkToolbar" style "gtkcompactextra"
class "GtkPaned" style "gtkcompactextra"

Básicamente, las expresiones que comienzan con "style" son reglas de estilo, mientras que las expresiones que comienzan con "class" aplican una regla de estilo a algún tipo de widget gtk. Luego de este cambio, al iniciar eclipse se ve prácticamente con el mismo espaciado que la versión de windows:


Notar que particularmente el problema es que todas las themes gtk que comunmente vienen instaladas dejan demasiado espacio (en el contexto de un programador) entre items del widget Tree de gtk (GtkTreeView).

Este pequeño cambio hace, en mi opinión, 100% más utilizable a eclipse en linux.

.... Y los años transcurrieron y esta información sigue siendo relevante para eclipse 4.3 en linux arch, y especialmente más útil ahora que eclipse 4.X desperdicia muchísimo más espacio, veamos el antes y después:
Antes: 

Después:


Notar la gran diferencia de ahorro de espacio en la tool bar superior y en el árbol de trabajo de la izquierda.BTW - at least in arch linux -  you can modify the file /home/sg/.gtkrc-2.0.mine instead original and often auto generated /home/sg/.gtkrc-2.0

lunes, 4 de mayo de 2009

tomcat 5.5 behind apache 2.2

Recently I needed to add a web application hosted in tomcat 5.5 to an apache 2.2 web server that already serves static content, svn, web dav, etc. I tried lots of ways of making this, and in this document I will describe the best sollution I've found.

In your apache's httpd.conf file add the following lines, for example at the end of the file:


LoadModule proxy_module modules/mod_proxy.so
LoadModule proxy_ajp_module modules/mod_proxy_ajp.so
<Location /tomcatSite/ >
ProxyPass ajp://localhost:8009/
</Location>


This tells apache that all http requests pointing to http://yourhost/tomcatSite/ will be redirected to a running apache instance. So save the file, restart apache, start tomcat and try to navigate to http http://yourhost/tomcatSite/. In a regular tomcat installation you should see the tomcat's main page.

The idea is that apache to listen on port 80 and tomcat to listen on another port, for example 8080. In my case as I said, this allow me to have my j2ee application in http://yourhost/tomcatSite/ but taking advantage of apache's flexibility, efficiency, supported protocols/servers like svn, webdav, etc.

I hope this can be usefull for somebody as it was for me...

miércoles, 29 de abril de 2009

Generating a java bean from a properties file

little introduction to .properties files


Well, this is my situation. In my work, often I'm in need of making configurable stuff so non-programmer users can configure certain aspect of a application only editing text files. Xml is great for that, specialy if you want to support complex data and formally define de format of the document with a DTD section. But, sometimes you need to define only few configurable string values and in these circunstance xml can be like killing a fly with a gun. A much more confortable way in these cases is to use .properties resources. These are plain text files with for example the following code:

username=fulano
password=xyz
serverUrl=http://192.168.1.111


In the most common situation you left these files inside your classpath and some java class will read them.

In the last example, a web service client will read the account information from a .properties file. For reading the properties, we can, for example, name the file account1.properties and store it in the same package as some WebServiceClientManager.class. In side this class we simply do


InputStream stream = this.getClass().getResourceAsStream("account1.properties");
java.util.Properties props = new java.util.Properties();
props.load(stream);
String username = props.get("username");
String password= props.get("password");
etc.


Note that java.util.Properties objects are java.utils.HashMap representing the key=value in the .properties file. Note that because of the last, the order of properties is not respected.

Generating java bean class code from .properties files


Well, in my case, I feel more confortable dealing with java objects than with maps (in which you have to work with string ids). So I've created the following class that is able to create a java class code (a java bean) with the properties expressed in a .properties file:

public class Properties2JavaBean {
private Properties props;
public String propertiesToBean(String className,
String packageName) throws IOException {
String attrDef = "\tString ", methodsDef="",
constructorSignature="\tpublic "+className+"(", constructorBody="{";
Iterator<object> it = props.keySet().iterator();
while (it.hasNext()) {
String k = (String) it.next();
attrDef+=k;
constructorSignature+="String "+k;
constructorBody+="\n\t\tthis."+k+"="+k+";";
if(it.hasNext()){
attrDef+=", ";
constructorSignature+=", ";
}
methodsDef+="\n\n"+buildGetter(k)+"\n"+buildSetter(k);
}
constructorSignature+=")";
constructorBody+="\n\t}";

return "package "+packageName+";\n" +
"/** this class was autogenerated from a .properties file"+
" by Properties2JavaBean */\n"+

"public class "+className+"{\n" +

""+attrDef+";\n"+
constructorSignature+constructorBody+"\n"+
methodsDef+"\n" +
"\n\n\tpublic static "+className+ " newInstante(){ " +
"\n\t\t"+propertiesToBeanConstructor(className, "inst")+
";\n\t\treturn inst;" +
"\n\t}\n" +
"}";
}
public String propertiesToBeanConstructor(String className,
String instanceName) throws IOException{
String s = className+" "+instanceName+" = new "+className+"(";
Iterator<object> it = props.keySet().iterator();
while (it.hasNext()) {
s+="\""+props.get(it.next())+"\"";
if(it.hasNext())
s+=", ";
}
return s+");";
}
public void load(String s) throws IOException {
load(stringToStream(s));
}
public void load(InputStream s) throws IOException {
props = new Properties();
props.load(s);
}
String buildGetter(String propName) {
return "\tpublic String get"+changeFirstLetterMayus(propName, true)+
"(){\n\t\treturn this."+propName+";\n\t}";
}
String buildSetter(String propName) {
return "\tpublic void set"+changeFirstLetterMayus(propName, true)+
"(String attr){\n\t\tthis."+propName+" = attr;\n\t}";
}
public static String changeFirstLetterMayus(String strInput, boolean mayus) {
if(mayus)
return strInput.substring(0,1).toUpperCase()+
strInput.substring(1,strInput.length());
else
return strInput.substring(0,1).toLowerCase()+
strInput.substring(1,strInput.length());
}
private static InputStream stringToStream(String s) {
return new ByteArrayInputStream(s.getBytes());
}
}


So, for example, if I execute this conversor for the .properties example listed above, the following java bean class code is created:

package org.sgx.claroscuro;
/** this class was autogenerated from a .properties file by Properties2JavaBean */
public class ConfigBean{
String serverUrl, password, username;
public ConfigBean(String serverUrl, String password, String username){
this.serverUrl=serverUrl;
this.password=password;
this.username=username;
}
public String getServerUrl(){
return this.serverUrl;
}
public void setServerUrl(String attr){
this.serverUrl = attr;
}
public String getPassword(){
return this.password;
}
public void setPassword(String attr){
this.password = attr;
}
public String getUsername(){
return this.username;
}
public void setUsername(String attr){
this.username = attr;
}
public static ConfigBean newInstante(){
ConfigBean inst = new ConfigBean(
"http://192.168.1.111", "xyz", "fulano");

return inst;
}
}


Nice, eh? As you can see, in the static newInstance() generated method this javabean is instantiated with the exacly the same information stored in the source .properties file.

So, if you are dealing with .properties files for your configuration stuff, and you are making javabeans manually, this class can be usefull... Use it as you wish.

lunes, 20 de abril de 2009

json parser in visual basic 6

json parser in visual basic 6

Recently, in work, I encountered with the following situation. A visual basic 6 desktop program need to comunicate with our main web application via web services. This webservices are json based. Until recently, there were no json librery / parser for visual basic 6. Today I found the only (seems) json library for visual basic.

My knowledge of vb6 is short and I don't like it (or eny other ms devel tools). But it seems that you can embed a javascript aprser in your vb6 programs using "MSScriptControl.ScriptControl.1" object. So the json parser is there! With this little class:

'a very little json library in vb using MSScriptControl.ScriptControl.1
'@author: sgurin.

Dim ScriptControl
Dim initialized As Boolean

Public Sub init_class()
Set ScriptControl = CreateObject("MSScriptControl.ScriptControl.1")
ScriptControl.Language = "JavaScript"
initialized = True
End Sub

Private Function evalCode(json As String) As String
json = Replace(json, """", "\""")
evalCode = "eval("" " & json & " "") "
End Function

Public Function getProperty(jsonObject As String, prop As String) As String
Dim ret As String
Dim jsCode As String
If Not initialized Then
init_class
End If
jsCode = "var obj = " & jsonObject 'evalCode(jsonObject)
ScriptControl.ExecuteStatement (jsCode)
getProperty = ScriptControl.Eval("obj[""" & prop & """]")
End Function

'for example getSimpleArrayItem("[{foo:1}, {foo:2}]", 0, "foo") == 1
Public Function getSimpleArrayItem(jsonArray As String, index As Integer, prop As String) As String
Dim jsCode As String
If Not initialized Then
init_class
End If
jsCode = "var arr = " & jsonArray
ScriptControl.ExecuteStatement (jsCode)
getSimpleArrayItem = ScriptControl.Eval("arr[" & index & "][""" & prop & """]")
End Function

Public Function getArrayLenght(jsonArray As String) As Integer
Dim jsCode As String
If Not initialized Then
init_class
End If
jsCode = "var arr = " & jsonArray
ScriptControl.ExecuteStatement (jsCode)
getArrayLenght = ScriptControl.Eval("function js_arrayLength(a){if(a==null||a.length==null||a.length==undefined){return 0}else return a.length;}js_arrayLength(arr)")
End Function


using this class one can parse a json string with for example:

Dim parser As New jsonParser
Dim s as String
s="{age:18}"
msgbox "age: " & parser.getProperty(s, "age")


of another example:

Dim parser As New jsonParser
Dim size As Integer, i As Integer, s As String, json as String
json="[{age:18},{age:22}]"
s=" ages: "
size = parser.getArrayLenght(resp)
For i = 0 To size - 1
s = s & parser.getSimpleArrayItem(resp, i, "age") & ", "
Next i

Well, I hope somebody found this useful. Please feel free to use this code as a fundation for a real json parser in visual basic 6. We need more !

martes, 31 de marzo de 2009

Developing and debugging web applications in eclipse and tomcat

Point tomcat to our web applications sources and debug them in eclipse


Ok this is my situation. I like to program my java web app applications inside some ide like eclipse or netbeans and test them in tomcat. The idea is that tomcat take its resources directly from the eclipse workspace so just saving a file (like a jsp, .java, etc) will instantly apply the changes. Also we will be able to debug our web application java code.

Personally, I like to have my tomcat clean and under control, so I am not a fan of "web development tools" that came with these IDEs.

So, the main idea is for one side, having one project in the IDE with the entire web application resources (java, jsp, xml) and for the other side we will work with a tomcat which have defined a web application that points directly to the eclipse project resources. When we finnish, we will be able to:
  • Have all our web application in one eclipse project.
  • Simply saving modified .java or .jsp resources will impact inmediately the changes in a running application.
  • Debug java code inside eclipse while the web application is running, both in .java and .jsp files.
I will explain how to configure the web applications project inside the eclipse ide.

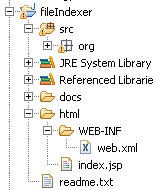
1) Create an eclipse java project. I suppose you will have one or more java source folders with your application logic, persistence classes, etc.

2) Define a directory for your webapp. Inside the created eclipse project define a directory that will contain exactly the files needed by your webapp application (the files that will be stored in $TOMCAT/webapp/$YOUR_WEBAPP_NAME). This means that your .jsps, WEB-INF/web.xml, WEB-INF/classes, META-INF/ will be here. Later, we will point tomcat to this directory so it will read the resources stored in this.

In my little application I named it /html/ and need to create /html/WEB-INF/web.xml, /html/classes.

3) Output .class files to your webapp dir. We must tell eclipse to put all .class generated files to /html/WEB-INF/classes. For this you have to, in each of your source folders, right click the source folder -> Build bath -> Configure output folder, choose "Specific output folder..." and enter html/WEB-INF/classes.

4) Point tomcat to the project resources. All we need now is to create a tomcat web application that points to our $ECLIPSE_PROJECT/html directory. The best way I found in Tomcat (5.x and 6.x) for doing this is creating the file $TOMCAT/conf/$ENGINENAME/$HOSTNAME/$YOUR_WEBAPP_NAME.xml with the following content:

docBase="$ECLIPSE_PROJECT/html">

in my example I had to create the file C:\apache-tomcat-5.5.27\conf\Catalina\localhost\fileIndexer.xml
with the following content:


docBase="C:\dev\workspace\fileIndexer\html">

If your application needs it, more information can be added to this context file.

5) Libraries. You will have to put all yout java libraries (.jar) in /html/WEB-INF/lib directory for making them available to the tomcat web app.

6) java compiler. We rest only one thing to do and is to be sure that tomcat and eclipse are using the same jre, and that eclipse is generating the propert version .class files. Tomcat uses the jre defined by the environment variable JAVA_HOME and prints to the console which jre is using like:

Using JRE_HOME: C:\Java\jdk1.5.0_15

So one thing we can do is, in eclipse Window->preferences->java->Installed JREs make sure to select the same jre tomcat's using and in Window->preferences->java->Compiler choose a java compliance level supported by that jre.

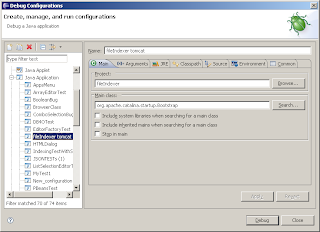
7) debuggin java in eclipse. Basically we will configure eclipse so tomcat is launched as a eclipse application. In eclipse go to : Run->"Debug configurations..." (or "Open debug dialog..." in 3.3 and previous eclipse versions). There create a new java application launcher, name it appropiately, and in the Main tab select your eclipse project and specify "org.apache.catalina.startup.Bootstrap" as Main class:

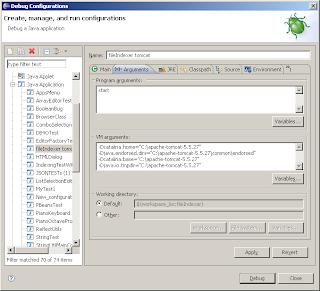
Now, in "Arguments" write "start" in Program arguments and something like the following (change it according to your installation):

-Dcatalina.home="C:\apache-tomcat-5.5.27" -Djava.endorsed.dirs="C:\apache-tomcat-5.5.27\common\endorsed" -Dcatalina.base="C:\apache-tomcat-5.5.27"
-Djava.io.tmpdir="C:\apache-tomcat-5.5.27"

Now, "add the external Jar" $TOMCAT/bin/bootstrap.jar in User entries, like in:


and last, in "Source" tab add your java project. Click in "Apply" to save and click "debug" for launching tomcat in debug mode.

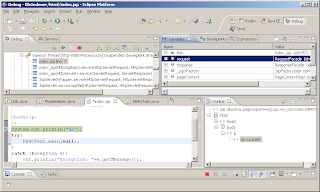
Breakpoints in your .java files, or even in you .jsp's java scriptlets will pause the web user requests and open the debug perspective. Try for example, adding a breakpoint in some java code of one of yours jsps, "debug as" your tomcat using the created eclipse java app launch configuration, point the browser to the later jsp and eclipse must pause the thread in debug perspective:

jueves, 5 de febrero de 2009

a personal problem with struts...

I do almost all my work in a j2ee big portal application. Sometimes my work consist in developing portlets using among other things, struts, jsp, etc. Here is something about struts that i'm always unsure of:

in a struts action file, if you invoque

res.sendRedirect(url);

this will be like if the user navigates to that url, first execute the correspondent struts action, and the show the user the related page

another different thing is doing a

setForward(req, page_name)

this will inmediately show the user the indicated jsp without invokling the correspondent action

This note is only for me, i always get confused about which one of these two use ...